
Contents
Any paid event that takes multiple employees out of the office such as holidays and conventions need to be recorded, but what is the best way to record them? Instead of adding a modify time entry for each individual employee, admins in TimeClick can save a lot of time by using the Mass Entry feature. The Mass Entries feature allows admins to add actions for multiple employees who need the same hours ranging from clocking in/out, holiday, vacation, and sick time. Below are instructions for using mass entries in all versions of TimeClick. If you don’t know how to check your version yet, go to Help >> About TimeClick in the upper-left corner of the TimeClick window.
TimeClick 2018
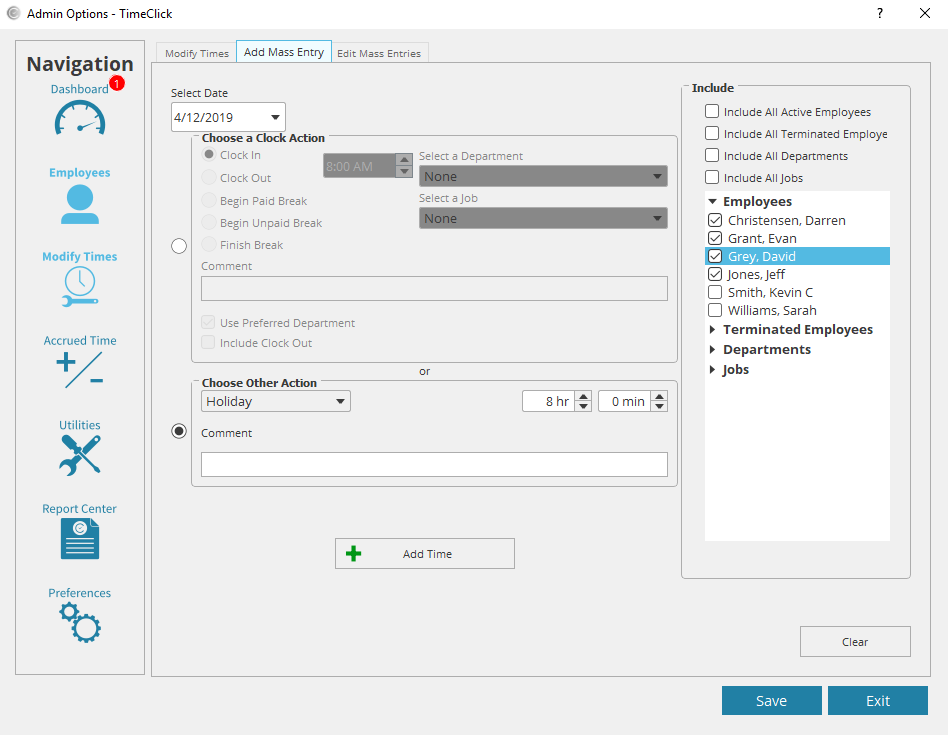
To access the Mass Entries portion of the software, enter Admin Mode >> Modify Times >> Mass Entries tab.
Add Clock Actions
In this window, you will see a date drop-down and two sections labeled “Choose a Clock Action” and “Choose Other Action.” First, select the date you are adding the time for. If it’s for an event like a convention where your sales team will be out of the office but would need to clock in and out, select the top “Choose a Clock Action” section by selecting the bubble to the left of it or clicking in that section. Choose the clock action and the time.
If you track departments or jobs, select the department this action applies to. It’s recommended to include a comment which will appear on the reports. If you are adding a Clock In, mark the box “Include Clock Out” to prevent missing or duplicate entry errors on the reports.
Add Holiday Time
If you are adding something like a holiday, say Christmas day, you’ll select that section or mark its bubble >> choose Holiday in the drop-down >> and enter the number of hours it counts for. Reminder: Please be sure you have selected the appropriate date at the top of the window so you don’t add holiday time for today rather than December 25th or whichever holiday it is at the time.
Please Note: Remember to select the employees the action applies to. If you are adding a clock in or out for only a certain group of employees, use the drop-down menu on the right of the window to select the employees or departments to include. If you add it to all employees when it is not applicable to everyone you will have to go back to Modify Times to remove the mistaken action in each employee’s record.
When you have finished putting in the information for the time, selecting the correct date, and appropriate employees, click Add Time at the bottom of the window. The time will be immediately be added to any employee you selected. You can see this entry in their reports. Heads up: again, the Add Time button adds the time immediately. It’s not always easy to undo a mass entry if it was added to a bunch of the wrong employees. Make sure you select the correct employees. The Clear button in the lower right-hand corner resets the entire window if needed.
Versions 10, LE, SP1, 12, 16
These five legacy versions of TimeClick use essentially the same steps for using Mass Entries although the graphics will look a little different as version 10 is a much older version.
Employee Eligibility for Holiday or Other Pay
The first step in using Mass Entries to give employees Holiday pay is to make sure that your employees are eligible to receive Holiday pay. To do this
- Open Administration Mode
- Select Employees > Edit Employee Record
- Select Employee’s Name > Misc Options
Make sure that the box next to “Eligible – Holiday Pay” is checked (or ensure the employee is eligible for whatever pay type you’re entering). Repeat this process for any employee whose eligibility either has not been assigned yet or you are not sure whether they have been made eligible. In version LE 16 all employees by default are eligible for all hour types including vacations, sick, PTO, and overtime. All earlier versions of TimeClick have none of the employees eligible by default so you will need to manually mark them as eligible.
Creating the Mass Entry
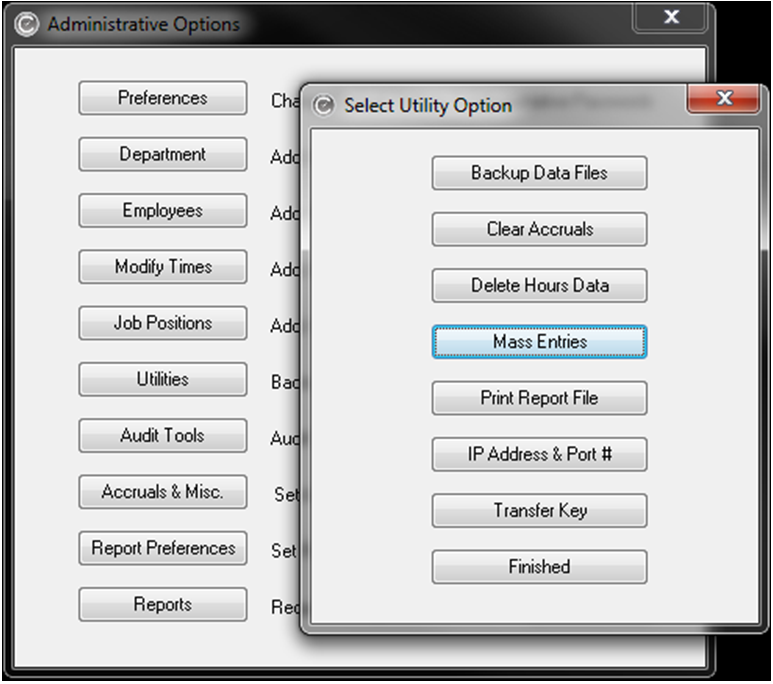
Now we’re ready to add the mass entry. Enter Administrative Mode and select Utilities > Mass Entries.
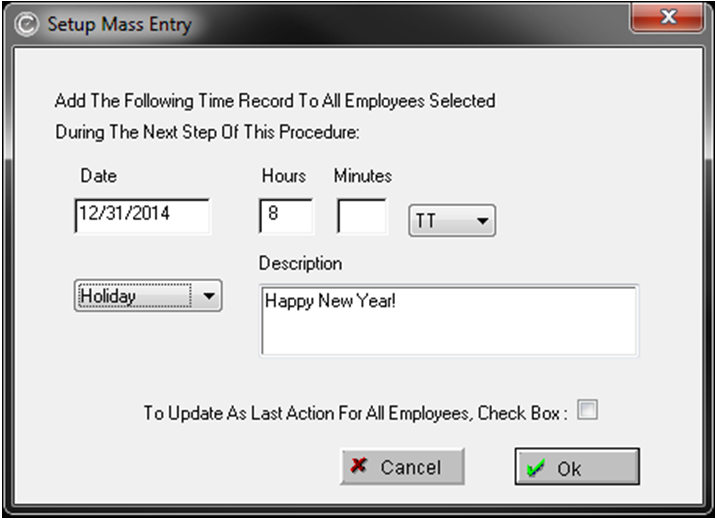
- Select a date for the entry. The date box only accepts numeric input, so don’t worry about adding dashes or slashes in between the month, day, or year, those will fill themselves in. For example, you can type 01012019 rather than 01/01/2019.
- Select a clock action. In this example, we’ll be selecting Holiday. Since we’re adding Holiday pay in this example.
- Next, add the Hours and Minutes, even if the entry for minutes is 00. If the 00 disappears after you enter it, don’t worry you can continue. Be sure to add an input for Minutes. Failure to do so will cause an error message to appear.
- Select whether the action is AM, PM, or TT (for Total Time). In this example, we’ll select TT, since we’re adding 8 Hours and 00 Minutes of Total Holiday Time.
- You also have the option to write a message for the clock action that will appear on the reports, but this step is not required.
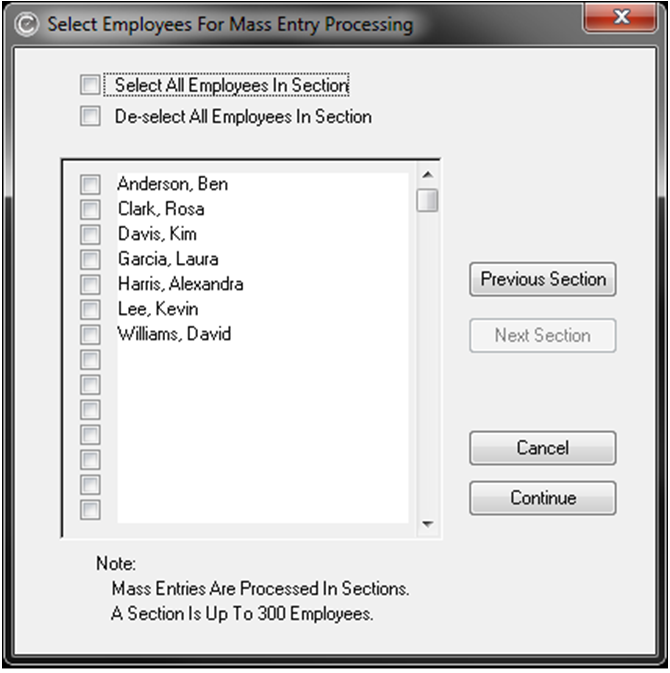
Now you’ll be able to choose the employees for which you’ll add the action. You can check “Select All Employees In Section” or “De-Select All Employees In Section” to speed this process. Now, select Continue and you are finished. You will follow these same steps if you are adding any other type of action including a mass clock in and out. If you add a clock in, you will need to add a clock out as well to avoid duplicate entry errors on the report resulting from a missed clock out.
If you receive a “Record Not Added for Following Employee No. & Name” error, then you will need to repeat the process and add an input to the Minutes box.