
Contents
This post walks you through the various report printing options available in the different versions of TimeClick. If you’ve used or seen the different versions over the years, especially with the most current TimeClick 2018 version, you’ll know that they are all a bit, well, different. Report printing options are much, much smoother and faster in version 2018 but the instructions for older versions aren’t too difficult. To check your version, open TimeClick >> Help >> About TimeClick.
TimeClick 2018
The printing options are straightforward in this version. You can print either a PDF or CSV of the reports.
PDF Reports
- Open Admin in the top right of the main screen
- Enter your Admin password
- Go to Report Center
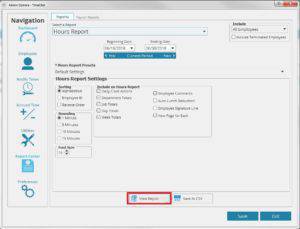
- Select the report you want to view such as the Hours Report
- Choose all the settings and items to view on the report
- Click View Report
The report will open using the default PDF viewer you have on your computer such as Microsoft Edge, Adobe Acrobat, Chrome, etc. When you are viewing the report, you will have options to save and print and potentially email from there depending on the PDF viewer you use. To print, simply use the same method you always would to select Print and choose the printer. That’s it!
CSV Reports
- Log into Admin mode
- Go to the Report Center
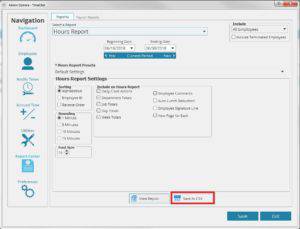
- Choose your report such as the Hours Report
- Select which totals and settings you want to apply
- Click the Save as CSV button
The report will open in a spreadsheet like one in Excel but will be in CSV format. The CSV format is a Comma Separated Value sheet so payroll software can easily import the hours report.
Versions LE 16 and LE 12
These two versions are not too far behind version 2018 but still take a few extra steps to save reports to PDF or XPS. If you would like to upgrade to version 2018, please contact our support team at support@timeclick.com for details specific to your company.
Printing Reports
In these versions and all previous versions, TimeClick reports are generated using a system from within the program, not a PDF viewer already on your computer like Adobe or Edge. When you open TimeClick, there is an option to print. This print option only uses the default printer attached to the computer.
Save to PDF or XPS or Choose Printer
To select which pages of the report to print, choose the printer, and/or save the report as a PDF or XPS document, follow the instructions below.
1. Right-click on the TimeClick icon and choose “open file location.”
Note: If you do not see Open file location, select open, and then select find target location. This will take you to the TimeClick directory which is normally located in C:/Program Files(x86)/Hawkeye Technology Inc.
2. Browse to the TCForm file and double-click to open it. You may be prompted to choose which program you would like to use to open the TCForm file. If this window appears, select Notepad.
3. On the line that reads SETPRTDIALOG, change the 1 to a 3 without changing any of the spacing.
4. And now save the changes by going to File, Save, and then close out of notepad.
Now, when you run a report on this computer, the following screen will appear.
Even though the print screen has appeared, TimeClick will still allow you to preview the report first before actually printing. To get to the print preview select print.
Once the report preview appears you can review the report and then click the print button in the upper left-hand corner. The printer options screen will appear again, and then you can change printers, changes the pages to print or save the report.
In order to save the report, you will need to select the Microsoft XPS Document Writer or PDF lite as the printer. A .XPS file is Microsoft’s version of a PDF and the XPS Document Writer comes pre-installed on any newer Windows PC. You may have to download the PDF lite from Adobe’s website if your computer doesn’t already have it. When you select print with the Microsoft XPS Document Writer or PDF Lite as the selected printer, it will let you choose to save the report in any specified location on your computer.
Version LESP1, LE, and 10
These three versions are getting back into the older report system. The functionality and appearance of the reports are different from newer versions but can still be printed and used. It is highly recommended to upgrade to version 2018 if you are still using these versions as they are no longer fully supported due to their age.
Printing Options
Earlier versions of TimeClick use a reporting system that came before the ability to choose your printer at the time you run reports. To save a PDF or XPS report in this version you will need to change the default printer of your computer to a PDF or XPS printer. To print reports like normal,
- Enter Administration mode
- Go to Reports
- Select the report you need to run
- Choose the date range and click OK
- Click the Print icon in the upper left corner of the report preview when it opens
Export to CSV
In order to export reports, a few options need to be selected in TimeClick.
- Open Administration mode in TimeClick
- Select Preferences
- Select Passwords & Misc. Controls
- Select the checkbox next to Save Report File and Create Data Extraction File
Note: these options only need to be selected once. These options will remain marked unless manually changed.
There are two reports in TimeClick that can be exported to excel. TimeClick will create an extraction report for both the Individual Hours report and the Combined Hrs and OT report. After running the Individual Hours report TimeClick will automatically create a .csv file of the report. This file can be found in the TimeClick directory. This file, when opened, will open in excel.
The Combined Hrs and OT report work a little bit differently. The Combined Hrs and OT report actually run three reports when used. The final report is the extraction page, this has a breakdown of the employees and the hours they worked. This is the page that will export to excel. The easiest way to access this file in Excel is:
- Open Excel
- Select Open
- Browse to the TimeClick directory
- Next to File Name change the file type to All Files
- Open the TCPayroll file
- Follow the import wizard
You will end up with an Excel sheet with your employees’ names, number, and the hours they worked. Some of the columns may have a zero, this is because each column represents different types of hours worked. Regular Hours, Overtime Hours, Vacation Hours, etc.