

Contents
This post refers to TimeClick version LE 16 and earlier
If you want your database on a different computer than the one employees clock in and out on, particularly for a LITE or Single Computer License, you may consider setting up what we call a headless server. This allows you to store the TimeClick database on a server computer in another room and install the grey TimeClick icon on a different computer in the front office for employees to clock in and out on.
Please note: You will need to notify our tech support that you have a headless server set up if you call in for support.
Pros and cons of setting up a headless server
Pros
• You can maximize your license size use if the icon on the server is never used either due to the server being in the back room or for other security reasons.
• You can save the database on a server computer that is backed up and not often used so you have less chance of losing the data if something happens to the computers in your office.
Cons
• Registration errors come up on the database computer if an individual at the company doesn’t know about the setup and attempts to open TimeClick on the database computer instead of the registered computer.
• It can make tech issues confusing for all involved in troubleshooting if someone from your company working with our reps does not know a headless server is set up and our techs were never informed of the setup.
• If you need to move TimeClick, either the registered workstation or the database, to a different computer it can make the process more complicated.
Diagram of the General Setup Process
For all the visual learners out there, here is a general diagram to break down the setup steps.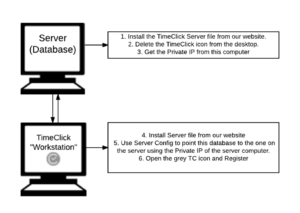
STEPS:
Starting on the server computer:
1. Download the Server link for TimeClick from our Install Files page.
2. Follow the steps on the Installation Guide for the download and install.
3. Delete the grey TimeClick icon from the server’s desktop. The TimeClick database is still intact and accessible but deleting the icon eliminates a lot of confusion about which computer to clock in and out on.
4. Find the Private IP address on this computer following these instructions.
On the workstation:
1. Download the Server link for TimeClick from our Install Files page.
2. Follow the steps on the Installation Guide for the download and install.
3. Search for Server Config in your computer’s Start menu.
4. Click Change in the TimeClick Configuration window.
5. Type in the Private IP address found on the server computer.
6. Type in the Port 12010.
7. Click OK and Connect.
8. Open the grey TimeClick icon and register from this computer.
Some notes about what to expect
• With this setup, employees will be able to clock in and out on the registered computer with the grey TimeClick icon smoothly.
• When you install other Clients, or actual workstations with the blue TimeClick icon, they will also be connected to the database computer’s IP address, not the computer with the grey TimeClick icon that acts as a workstation.
• If you open TimeClick on the server (either you didn’t delete the icon from the desktop or someone searched for TimeClick in the computer’s programs and opened it), you will see an error saying “Fatal error – #912 Pgm Aborted.” This is a registration error meaning that this computer is not recognized as the registered computer because the other computer with the grey TimeClick icon was registered. Close the error and double check that TimeClick still opens on the TimeClick workstation with the grey icon on the desktop.
Using a headless server setup can be useful but be sure to keep track of which computer is which, the server where just the database is and the workstation where the grey icon is.